Email Signature Format
Please download and save this logo to your computer to use for your signature.
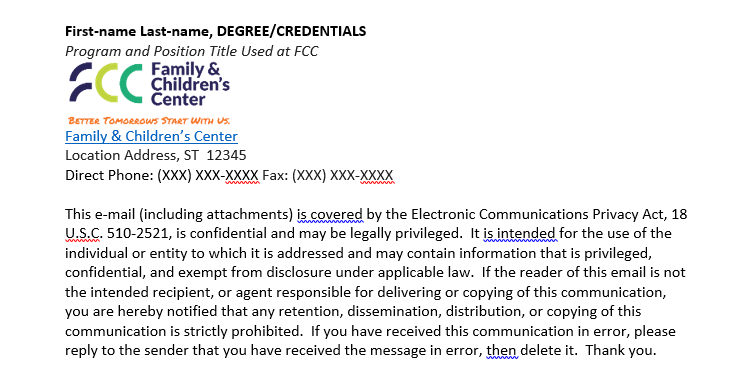
To keep Family & Children’s Center branding consistent across the agency, please set up your signature in the following format:
- Save the logo to your desktop (right click on .png and then select “save image as”).
- Go to your email settings. Settings located in the upper right hand corner underneath your account picture. Click the gear icon
 and select “See all Settings”.
 - You will land in the General tab of the Settings menu. Scroll down until you reach the Signature settings area.
- Choose to make a custom signature (underneath No Signature option) by selecting “+ Create New”. Follow the above format for creating your signature
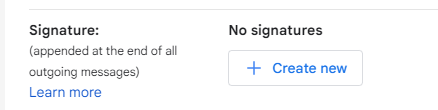
- A window will pop up. Name your signature and click Create.

- Hover your cursor in the blank space, left click one time. Your blinking cursor will appear in that space.

- Ensure that the font is set to Sans Serif and font size is set to Normal.
- You will bold your name and degree/credentials. Including your degree/credentials is optional.
- You will italicize your title/program.
- Insert the logo by selecting the
 photo icon. This opens the Add an Image tab. Navigate to where you have saved the logo, select it, and click Select.
 - Single click on the logo and change the size to Medium.
- Hyperlink the website for Family & Children’s Center.
- Add the address for your work location
- Add your direct work phone number or the general number for your work location. Add the fax number for your work location.
- Copy and paste the Privacy Act disclaimer paragraph (below). Set the font size to Small.
- This e-mail (including attachments) is covered by the Electronic Communications Privacy Act, 18 U.S.C. 510-2521, is confidential and may be legally privileged. It is intended for the use of the individual or entity to which it is addressed and may contain information that is privileged, confidential, and exempt from disclosure under applicable law. If the reader of this email is not the intended recipient, or agent responsible for delivering or copying of this communication, you are hereby notified that any retention, dissemination, distribution, or copying of this communication is strictly prohibited. If you have received this communication in error, please reply to the sender that you have received the message in error, then delete it. Thank you.
- Under Signature defaults select the signature you just created for both new email use and reply/forward use.

- Scroll down to the bottom of the page and click Save Changes.
- A window will pop up. Name your signature and click Create.